 Sign-up for free online course on ANSYS simulations!
Problem Specification
1. Start-up and preliminary set-up
2. Specify element type and constants
3. Specify material properties
4. Specify geometry
5. Mesh geometry
6. Specify boundary conditions
7. Solve
8. Postprocess the results
9. Validate the results
Step 4: Specify geometry
Because of the inherent symmetry of the model, we'll perform the analysis on a quarter of the volumes only. Recall that a=0 (i.e. angle between the planes in which radii R1 and R2 lie is zero). As a result, the upper and lower volume have the same orientation, when viewed from the top.
...
Enter the keypoint locations:
Keypoint 1: X =0, Y =0, Z =0, Click Apply.
Keypoint 2: X =R2, Y =-R2, Z =0, Click Apply.
Keypoint 3: X =R2, Y =-R2p, Z =0, Click Apply.
Keypoint 4: X =0, Y =-R2p, Z =0, Click Apply.
Keypoint 5: X =0, }}Y {{=-inter, Z =0, Click Apply.
Keypoint 6: X =R1, Y =R1-inter, Z =0, Click Apply.
Keypoint 7: X =R1, Y =R1p-inter, Z =0, Click Apply.
Keypoint 8: X =0, Y =R1p-inter, Z =0, Click Apply.
Keypoint 9: X =0, Y =-R2, Z =0, Click Apply.
Keypoint 10: X =0, Y =R1-inter, Z =0, Click OK.
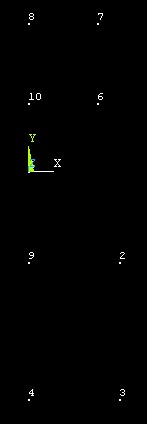
Create Lines
Main Menu > Preprocessor > Modeling > Create > Lines > Lines >In Active Coord
...
Save Your Work
Toolbar > SAVE_DB
Go to Step 5: Mesh geometry