...
- Once your Hosting Virtual Machine (VM) has been created and instance(s) set up, you can access information and the VM from the Hosting Dashboard via https://dashboard.hosting.cornell.edu
 Image Removed. This is a one stop shop to controlling services on your VM (yes you can stop and start your instances), as well as finding specific information about your instance(s). The Hosting Dashboard should list all VM's you have access to based on the AD Group or Permit that's been assigned to them.
 - Once Now you've logged into the Hosting Dashboard, and you find the VM that you were assigned, if you click on that VM name (should look like webhost###.serverfarm.cornell.edu), the dashboard takes you to the Status page of that VM. This shows you what services are running, and this is where you can stop/start/restart/configtest Apache and/or Coldfusion.
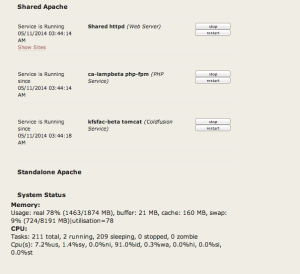
- At the bottom of the Status Page there are "Quick" links to the instances created on the VM. These are links to the Splash page of each instance(s) and any virtual hosts that have been configured for those instances.

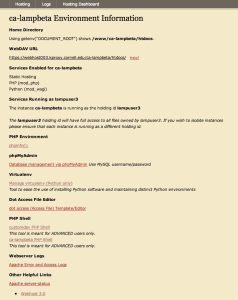
- Instance Splash Pages contain important information for that specific instance. Remember, virtual machines could be running several instances, and each instance could be serving out different websites, and potentially running different software (some with coldfusion, some not). Splash page shows you (these will vary depending on what you request to have activated on each instance):
- The Instance name
- Tabs to the Hosting pages, Logs, and Status page (service control)
- Path to the Home directory/document_root that Apache is configured for
- Webdav URL to use to upload your files
- Services enabled for this instance
- The userID holdingID running the instance (very important for separation of services/access permissions: see HERE for more information)
- Dot "." access file editor: used to modify .htaccess and .wdaccess files
- PHPShell - provides Shell-like access to the VM (there are limitations)
- Links to log files
- Apache server status
...
The Cornell Stack continues to support Webdav access to upload/modify/delete the files for your website/application. The access URL previously used for Hosting services in Coldfusion 9 and LAMP2 is are no longer used here. The webdav url is specific to the VM your instance(s) lives on.
- Log into your Splash page on your VM to find the correct URL string to enter into your chosen Webdav client. It should look similar to this: "https://webhost000.kproxy.cornell.edu/Image Removed<instance-name>/htdocs" where:
- Replace "webhost000" with the VM name you were given when Webservices created the VM/instances for you.
- "<instance-name>" - is the specific instance you want to modify on the above VM - can be found on the Hosting Dashboard or Splash page
...
- CyberDuck (Mac and Windows)
- Dreamweaver
- Mac "Connect to Server" option
- More information can be found here
HoldingID - what is this?
The Cornell Stack allows mulitple holding ID's to permit, and restrict access across applications living on the same VM. This is ideal for those customers who may want to host multiple instances on one VM but provide more isolation between the applications. Utilizing and changing the holdingIDs and file permissions should be reserved for experienced web developers and those knowledgable in Linux file permissions.
- The "lamp" user should be viewed as an administrative account and can access all files on the filesystem
- "lampuser##" users are specific to each instance, unless requested otherwise.
- PHPShell access is how customers can use command-line access to move around in the environment, and change permissions as needed.

